With the latest rise in WordPress insecurities, measures have been taken to ensure WordPress users are able to guarantee website visitors of secure environments.
While WordPress remains the top most used content management software, all its websites are prone to security threats and without initiating security measures from the beginning, it begins to lose value and trust amongst most users. This is one of the reasons why you need to have an SSL certification for your WP site as this is the beginning of ensuring secure connections within servers.
To take you back, in 2014, Google did declare HTTPS to be a ranking factor in their SERPs. This shift made most WordPress users consider installing SSL certificates for their sites in order to obey this regulation.
Prior to this, SSL certification was being used on eCommerce websites or sites that took essential data from web visitors such as credit card details that needed encryption. By using this, HTTPS ensured that no credentials or data was allowed in plain text or any readable formats.
When it comes to search engines such as Google they normally take this as a serious precaution to all website owners. In any case a site has no SSL certification, they give it less priority even when it comes to crawling and ranking it.
For instance Google Chrome from 2018, could detect websites with no SSL and denote them to visitors as “Not Secure”. This definitely affects your web traffic and thus affecting your leads and conversions.
In this article, we shall discuss more about SSL certificates, what importance they contribute to WordPress sites and how users can actually configure them to their sites. We shall also highlight some of the best plugins users could use to configure SSL within their site.
Table of contents
Types of WordPress SSL Certifications
Why should I configure SSL in my WordPress site?
Steps to Configure SSL in WordPress
What is SSL
Secure Socket Layer (SSL) is a security measure used on websites to encrypt any transferred information between servers.and browsers used by visitors.
By installing an SSL certificate your website switches from a HTTP (Hypertext Transfer Protocol) to HTTPS protocol where that S means secured. This makes it difficult for any intruder to access your information that you gave in a particular enabled SSL website. It is usually signified by use of a green padlock on web browsers to show that the site is safe for use.
Types of SSL Certification in WordPress
With the evolution of this encryption technology, there have been a variety of SSL certificates that WordPress users could make use of. The common types of HTTPS certificates include
- DV (Domain Validation) certificates
These are the most used types of SSL certificates by most wordpress users. They are used to ensure your site is secure and they come in various ranges depending on the domains you have. Among them are single domain SSL, multi-domain SSL, wildcard(can be extended to subdomains) etc.
- OV (Organisation Validation) certificates
These are normally certificates that are used for organisational security validation. They are a bit harder to obtain and add no additional merit compared to the DV certs.
- EV (Extended Validation) certificates
Extended validation certs do require an in-depth verification process for WordPress users to get one. In most cases, they are used by huge companies that deal with major security issues. They are also more expensive compared to the other types of SSL certificates.
Why should I configure SSL in my WordPress site?
There are basically two reasons why WordPress users should consider installing SSL certificates in their sites and we have mentioned them before.
- Enhance Security
- SEO – rank higher
These two come with additional merits for your site or company.
To start with security purposes, by protecting your site from intruders getting your visitors info through encryption of this data, you stand to win the visitors trust.
One way or another, if a visitor is turned to a client for your WordPress site, and he or she has never faced any security issue with their data, then it is more likely that they will trust your site more. It boosts visitors confidence and encourages them to enter their information without the fear of a bleach of any sort.
On the other hand, when it comes to SEO, SSL certificates have a way of communicating with modern browsers before a visitor accesses your site. By the indication of a padlock or “Secure ” on a browser address bar, it assures that the site is encrypted.
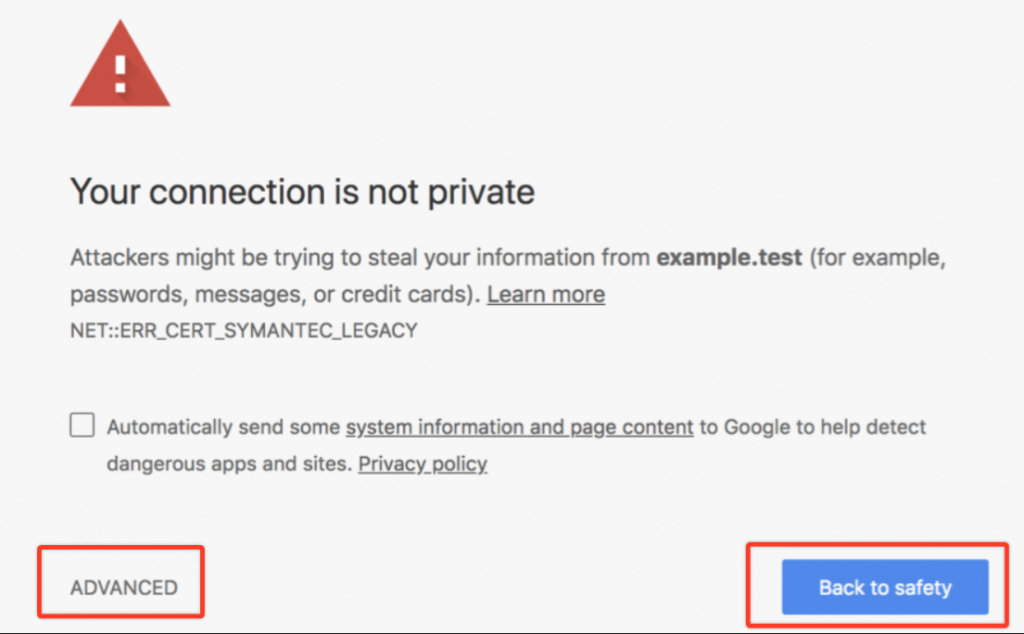
Browsers like chrome guarantee safe passage. In case there is no SSL, the browser warns the visitor from proceeding to the site. This makes your website have a high bounce rate on search engines and it entirely hurts your site’s ranking. SSL enabled websites also are indexed more on search engines compared to non SSL sites.
Steps to Configure SSL in WordPress
Purchase or Get Free Certificate
There are several SSL providers out there some that offer it at a cost and others that will give it for free upon purchasing a domain. Hosting companies would be the best recommendation to get your first SSL certificate.
Most of the hosting providers do offer the Domain Validation SSL type of certificate which is the most common. Some of the recommended WordPress hosting providers which give free SSL certificates for all their users include the following: Bluehost, SiteGround, Liquid Web, and Dreamhost.
The other common providers like Goddady and Namecheap will offer you SSL certificates at a cost below ($10). However, always do a research of the hosting provider before purchasing anything.
There are other vendors that could provide you with credible SSL certificates at a price among them being Comodo and Trustwave. While purchasing, always use the Nginx type of the web server as it works best.
Change Site URL
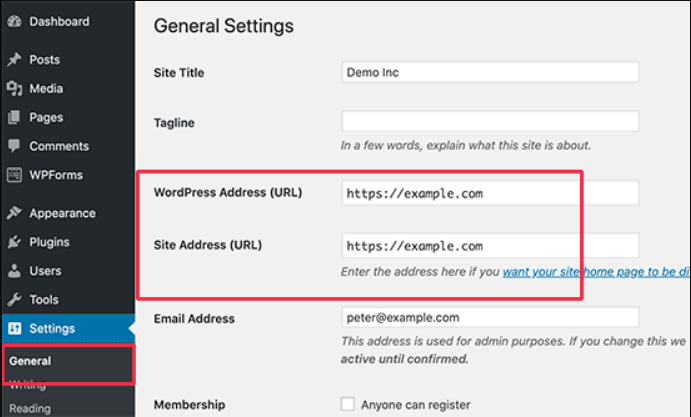
Upon getting your SSL, you need to change your site’s URL from the default HTTP to HTTPs. This should let you view the padlock sign in the browsers address bar to signify your site is safe for use. To do this users need to go to their site’s Dashboard > Settings > General and change both the WordPress Address and Site Address urls to use “https://” instead of “http://”. This however can be done through enforcing https method with a plugin.
Ways To Set up SSL Certificate
WordPress users who gain their certificates through hosting providers can easily set up and activate them within the CPanel admin. However, users who have obtained SSLs from other vendors need to set it up manually via various steps.
Via Private Key
This method applies to users who obtain their SSL from external vendors. For instance going by this method using ssl.com, users need to generate a CSR code (Certificate Signing Request ) which contains information about your website and a private key (RSA) which is used for authentication. Users need to do this by filling their information on this form at ssl.com.
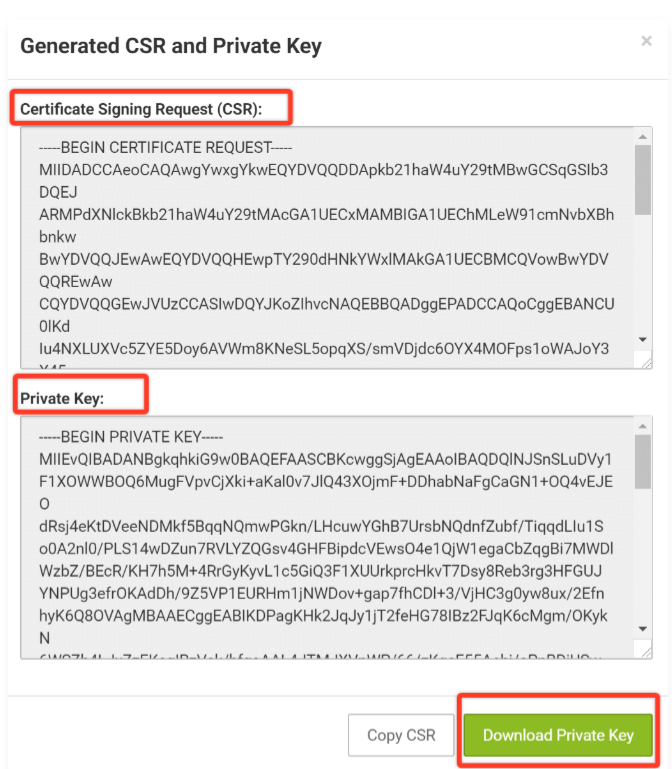
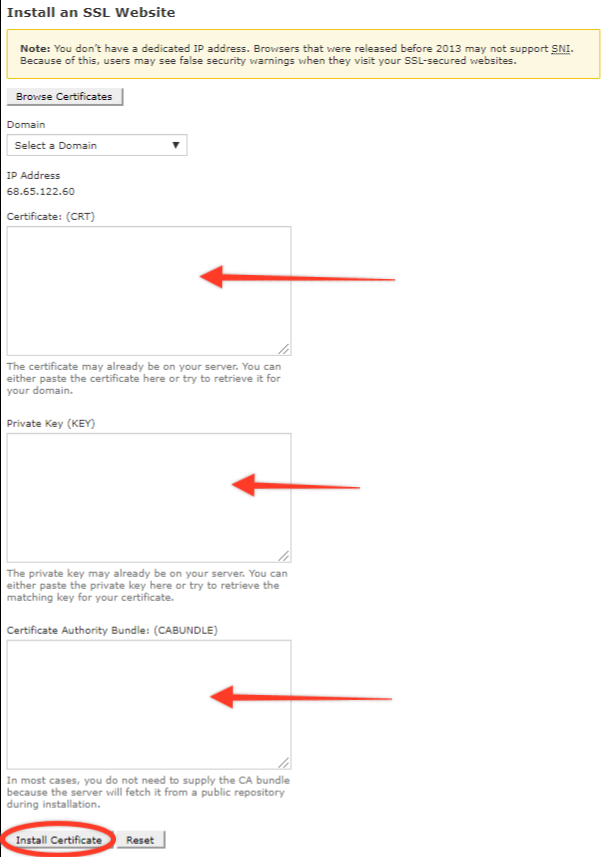
This then generates the two encrypted codes which the user can download, which you should save. Once you have regenerated your SSL, certificate many of these SSL providers do email you a .crt file and a .ca-bundle file. You then need to go to your hosting provider and insert or upload these documents accordingly. Alternatively, you can copy and paste the contents of your .crt file in the “Certificate” section first and then the contents of the .ca-bundle file just below it.
Using a CDN (Cloudflare)
With a CDN such as Cloudflare, WordPress users can implement it within their sites and get a free SSL in the long run. It can be used to encrypt data between the server and the users browser by pointing a DNS (Domain Name Server) to them. However upon enabling this free SSL, the only visitor information which will be encrypted is from the browser to the Cloudflare servers and not to your hosting server. This is because Cloudflare acts as a gateway between your main server and the WordPress user or the website visitor’s browser.
- First you need to configure your website with Cloudflare in order to enable SSL. Follow through the steps in this article: how Cloudflare CDN can speed up your site and how to activate it, in order to know how to set up Cloudflare with your site.
- Once done, login to your Cloudflare account again and click on Crypto tab, and then switch the SSL setting to Full or Flexible. By using flexible mode it will encrypt any connection from the visitor’s browser to the Cloudflare server but not to your main server. Users can also opt to use “ full” or “full,strict” if they want to encrypt end to end connections.
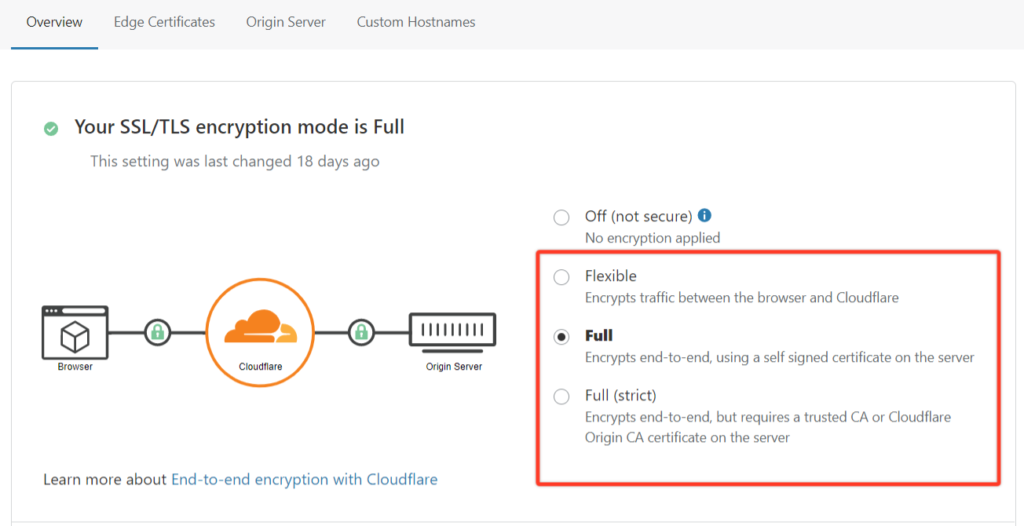
- For some time, you will then note that the SSL is being configured to your domain by indicating “Authorizing Certificate”. Once done it will switch to “Active Certificate”
- Next you will need to select the caching tab and click on the “Purge Everything” button and on the lightbox section again click on “Purge Everything”.
- Finally you can observe all changes on the overview tab where you will find the SSL status has changed to “Active”. By doing these few steps, you will have configured your site with SSL fully.
Force HTTPs To WordPress Site
Once you have installed the SSL Certificate for your domain, you are then required to enforce all requests made for your site to “HTTPS”. There are various plugins meant to force HTTPS and WordPress users can utilize them to achieve this. In this case, we recommend using the Really Simple SSL plugin as it automatically makes changes to the .htaccess file in case it finds an SSL configured within your site.
Upon installation of the plugin just click on “Activate SSL” and login again to your WordPress dashboard.

Ensure all required settings are properly configured by going to Settings >> SSL and you should see all settings checked with green marks.
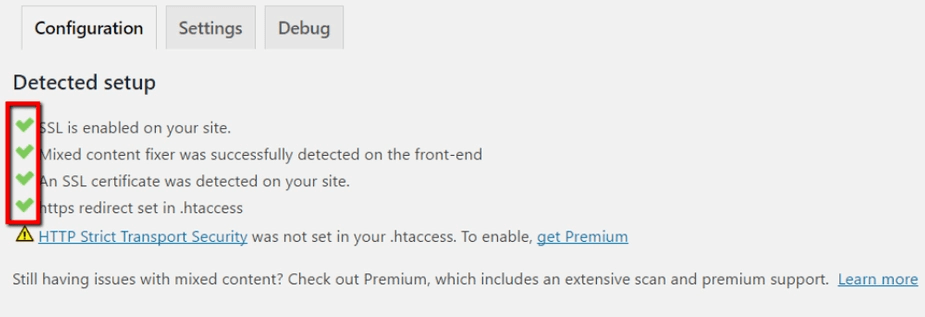
After enforcing https, users should then change the site url in dashboard >> settings>>general . Here you can modify the url Settings by ensuring the domain prefix is “HTTPs”. WordPress users can also modify the .htaccess file manually to change your site’s URL to HTTPs. Simply open the file in an editor and add the following lines of code.
<IfModule mod_rewrite.c>
RewriteEngine On RewriteCond%{SERVER_PORT} 80
RewriteRule ^(.*)$ https://example.com/$1 [R,L]
</IfModule>
Make sure to change the ( “example.com” with your domain).
Other Recommended SSL Plugins
There are a ton of WordPress plugins to use when it comes to setting up your SSL certificate and enabling HTTPs within your site. However, some of these plugins may take you through a long process or they may simply automatically make the necessary changes once your certificate is ready. Other than the Really Simple SSL plugin, here are some other recommendable plugin alternatives you can use.
- Easy HTTPS Redirection (SSL): – The plugin helps WordPress users to quickly configure a way of redirecting a standard http URL to the URL’s https version which forces your website visitors to see the https URL instead of the http. One could either opt to redirect all of the pages on their site to the https version or to pick various pages to redirect.
- WP-Force SSL: – This plugin also connects any HTTP URL to an HTTPS version. Most importantly, it allows web servers to declare that web browsers can only use HTTPS connections to interact with it by using HSTS(HTTP Strict Transport Security). In addition, it removes any inappropriate static resources without modifying the database and eliminates any external links.
- One Click SSL :- Finally this plugin does as it suggests, a simple one click to enforce HTTPs within your website. It ensures that all your website assets are loaded over SSL. The plugin also converts all non-SSL resources (images, scripts, stylesheets, etc.) to https:// on pages.
Wrap Up!
Configuring WordPress SSL could be less challenging than most users think and it may be a 1,2,3 step method. However, users need to follow the right guidance in order to do it right. By having SSL configured within your site it will make more visitors trust your site and they will be more confident if they want to share their information with a site. More so this will lower the bounce rate often marked by Google when it comes to SEO. By switching your site from HTTP to HTTPS version you stand to be more advantageous and one can not lose any data in the process.


No Comments