A sluggish website gives the business a negative image and it has been confirmed in many cases that slow pages can lead to loss of revenue. On the other end, quicker websites raise the profit margin – the faster the website is the higher the profits.
When you want users to interact well with your site, and create more profits, do not always worry about the appearance of the site, but actually how accessible your WordPress website is.
Most web developers spend a great amount of time improving their WordPress sites to increase the loading speed. It’s also a bit tedious to optimize static elements such as images, CSS and JS files, in particular when the site has a huge number of images, custom CSS and JavaScript files.
The use of a content delivery network (CDN) is an appropriate solution in managing such a media content-heavy site. It is a common feature in big sites, but somehow websites of every scale would thrive from the advantages of using a CDN.
There are various CDN services which can conveniently be linked to any WordPress site, to accelerate the loading process.
Throughout this article, we will talk about how to setup Cloudflare CDN as an easy way to improve the speed in any WordPress site with hardly any effort!
Table of Contents
What to Know
How to Setup Cloudflare CDN
Option 1: Web Host cPanel Cloudflare Configuration
Option 2: Manual Cloudflare Configuration
Extras
Using a WP Plugin to Optimize Cloudflare
Unique Cloudflare Settings for WordPress users
Wrap up conclusion
What is a CDN? Why Do You Need It?
This is a network of servers all over the world. They are configured to hold and provide copies of static/dynamic content from your WordPress platform. This includes images, Javascript, CSS and video streams.
Your site visitors are then served with this static data from the CDN servers once they make a request to your site.
Many standard WordPress hosting providers rely on secure and consistent platforms with the software needed to run WordPress at a reasonable cost to the hosting service provider and the user. Such hosting servers mainly operate on Linux-based environments with utilities like Apache, Nginx, PHP, MySQL, etc.
Reasons to have a CDN for your WordPress
- Increases Site Loading Speeds:
One of the most important reasons and key benefits to having a CDN in place for your WordPress site is to boost its loading speed.
Range distance from the server is among a website’s greatest speed killers. The range of distance between your hosting server and the browser used by the client visiting your site in particular.
Although the size of your page really matters, the length of distance the information on that page has to move will certainly be the main issue loading the website. - More Website Security
Some CDNs will quickly identify and block malicious bots to ensure that your site is secure once linked to a CDN.
With your site as your company’s source of income, a DDoS strike can actually halt the business. No matter whether you are on a shared hosting server or a dedicated hosting server, your website may not be capable of dealing with the huge traffic flow.
The very same idea used by a CDN to speed up your website could also be used to stop attacks from happening through the use of fraudulent traffic filtering by a universal server network controlling your site. - Saving on costs
It seems expensive to link a CDN on your site. So how exactly can one reduce cost with a CDN? The load shrinkage is one of the key aspects of saving on costs, especially whenever the servers are operating. Under many circumstances, the use of a CDN is less costly than introducing a CPU or RAM. The same goes for shared cloud providers. If you minimize the use of your resources, you do not have to upgrade to a better plan. - Many Geographical data centers
For example, if you are based in California, from your official network servers, visitors from Asia, Europe or Africa must use a variety of online overland jumps while accessing your website. Most CDNs have client-local data centers that lead to faster downloads and adaptive browsing based on their location. Visitors would like the ability to obtain on-the-go resources and services wherever they are in the world and this is why a CDN is really important for WordPress users and developers.
What is Cloudflare CDN?
Cloudflare has been one of the quickest and with shortest response time CDN providers. Cloudflare operates by loading and caching data from the nearest CDN server geographically, which will lead to speedier website loading alongside reduced latency and Bandwidth utilization.
Cloudflare CDN guarantees the site’s consistent availability and relays the request to another nearest server in case any CDN service crashes.
Cloudflare CDN now provides enhanced WordPress security from DDoS threats and traffic surges, a functionality which is important with the continued rise in the occurrence of DDoS threats. You can connect a variety of cloud platforms using Cloudflare CDN that enhances great client website experience, and more so it incorporates detailed analysis as well.
Very few CDNs have these numerous additional possibilities which are part of the reason why Cloudflare is used by so many people. Moreover, it is possible to also register on the platform for free and use almost all its optimization features.
How Cloudflare CDN Works
As highlighted above Cloudflare leverages the distribution to your visitor’s website assets. The data centers from Cloudflare support the static assets of your website and request unique web content from your source web server.
The global network from Cloudflare brings to access to the site to our servers quicker than a user who needs access to the website directly would be able to do.
With Cloudflare, even when there is high traffic between the website and users, requests for site assets and data are received earlier.
In terms of security, Cloudflare CDN dynamically checks the credibility of your website by analyzing the HTTP parameters for attack indicators from all requests performed via the browser. The request will be rejected in case of any hazard, once detected.
Cloudflare is indeed a reverse caching proxy server, which encrypts and secures every request in its servers. Typically only images or CSS scripts are cached, but a cache level can be defined by region and page limits can also be configured to bypass caches levels.
How to Setup Cloudflare CDN
Method 1: From Hosting Companies
Certain web host companies such as SiteGround, which are normally highly rated in various Facebook polls, will allow you to enable Cloudflare from their cPanel.
This configuration method for Cloudflare functions comparably with the most optimized hosting servers. You can install Cloudflare CDN on your website in a very few clicks when using SiteGround as your WordPress host provider.
- To begin with, sign in to your cPanel and browse to the segment of “Site Improvement Tools“. Next, simply click on the “Cloudflare” link to access it.

- Here one can find the complete list of domain names from your account. These can be the main domain, parked and extension domains. The manage button will provide you with access to all the control options for the selected domain for those who have enabled the Cloudflare CDN program.

- The very first tab on the ‘accounts’ section lists all subdomains on your SiteGround hosting profile and shows whether or not Cloudflare CDN is enabled for them. Tap on the Enable icon next to it if you need to activate the CDN feature for any subdomains.

However, you can also manually link the service to your website if your host doesn’t integrate with the Cloudflare configuration feature. This is in detail highlighted below.
Method 2: Manual Cloudflare Configuration
To enable Cloudflare for your domain simply proceed with the manual installation steps given below:
- Access the Cloudflare homepage at https://cloudflare.com and click on the ‘Sign up‘ button in case you do not have an account

- From there, the next section allows you to register a Cloudflare account, whereby you must enter your email address and password. Just input the requested information and simply select the ‘Create Account‘ button.

- The next stage is just to link the domain name of your website to Cloudflare so that your DNS records can be acquired:

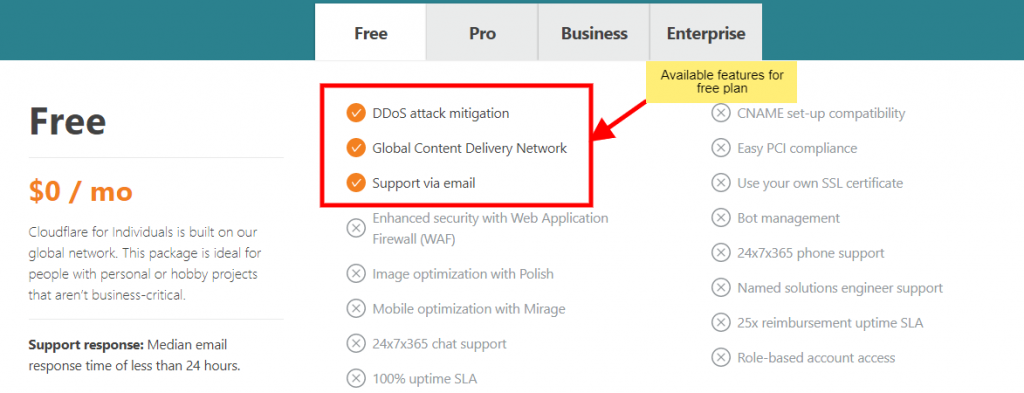
- You’ll be prompted to select a pricing plan on your next page. We will choose a free plan for the sake of this guide.

- Cloudflare will then display a listing with all DNS records that have been grabbed from your current domain. The DNS records you choose to transfer through Cloudflare will get an orange cloud symbol and a grey cloud symbol if the DNS record will bypass Cloudflare. You first have to check the list to ensure all your DNS records are on the list. If some records are missing you can add them from the Add Record button.

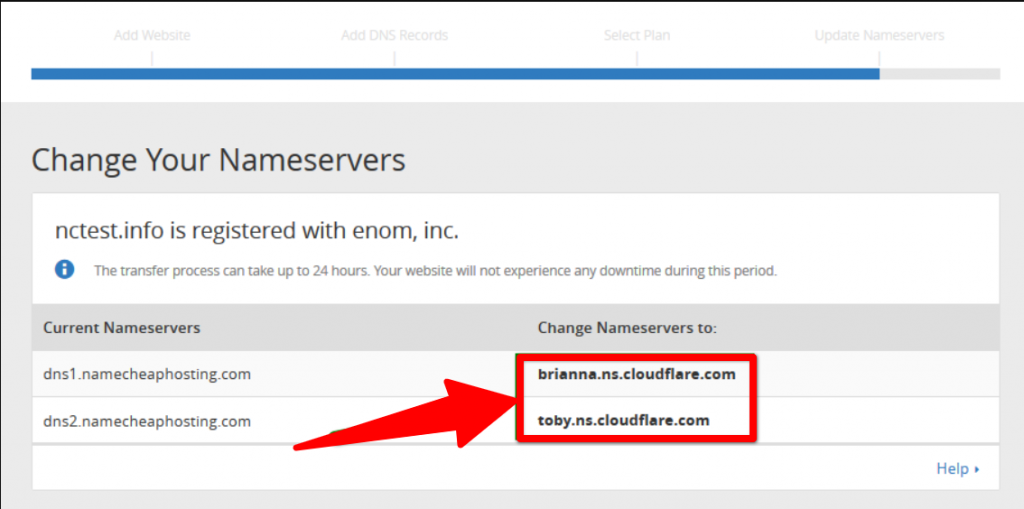
- Finally, two DNS name servers are given to you by Cloudflare(for example toby.ns.cloudflare.com) and you will have to set those the domain name servers on your domain registrar control panel. It might take some time to process through the network after changing the name server.

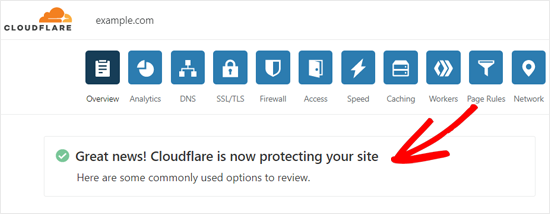
- Once the processing is complete and Cloudflare is activated, you will notice a success message on the Cloudflare dashboard.

Demo Video on Manual Cloudflare Installation
Extras
Using WordPress Plugin to Optimize Cloudflare
Cloudflare has a WordPress plugin which is free to download from the WordPress.org plugin directory upon logging into your WordPress Admins-> Plugins-> Add new and browse for Cloudflare. You can simply set it up across any and all WordPress sites.
Alternatively, the plugin can also be downloaded from this link.

The plugin guarantees that your blog comments are presented with the right IP address and also enhances the security of the site from spammers since they get flagged by Cloudflare.
This functionality is only accessible to those who have manually installed Cloudflare as mentioned above because to allow this plug-in, you will have to input Cloudflare API keys and email addresses. The API keys can be obtained through the Cloudflare “My Account page”.
Simply scroll to the bottom and you’re going to see the Global API Key. Copy and paste the key into your WordPress account.
Once on the dashboard, you can go ahead and apply as well as configure the page load settings plus the cache management settings.
Under settings, you can configure the image optimization settings if you are on a paid plan.
Moreover, security issues can also be applied within the plugin. The final tab simply shows the analytics of the Requests made, bandwidth and threats.

Unique Cloudflare Settings for WordPress users
- Configurations for SSL:
The settings for Crypto are set to request a free Universal SSL, switch HTTP to HTTPS, set the encryption level of SSL, and secure your SSL sites with HSTS.
- Set firewall rules:
This helps you in securing your plugins and other important sections of your website from reaching hackers.
- Set Page Rules:
Customizes different URLs to achieve Performance and Security and configure them according to the requirements of your website. A few examples include: pushing the WordPress admin section to have higher security; reducing the use of bandwidth via monitoring the refresh rate of Cloudflare cache; and overriding the cache. Only up to 3-page rules can be generated for the free plan.
- Setup a Speed Section:
CSS/ HTML / JavaScript can be minified, optimize images, dynamic Railgun content, speed up AMP via Accelerated Mobile links, and allow Brotli (works like Gzip).
- Use a Different CDN:
Multiple data centers lead to Faster loading speeds (StackPath, KeyCDN, and other CDNs build copy/paste CDN URL into your cache or CDN enabler).
- Activate hotlink security:
Blocks copying and pasting images from your site causes more bandwidth consumption.
Wrap Up Conclusion
Within this article, we discussed what really a CDN is and mainly focussed on the Cloudflare CDN free plan. Implementing Cloudflare within your website would really help in improving the overall user experience.


No Comments