Every day WordPress is becoming an easy to use Content Management System (CMS) platform for its users with the release of updates incorporating several features. However, WordPress seems to be facing various flaws depending on how users exploit it. Many of these issues tend to be overwhelming especially if they are experienced by beginners first, but normally their fixes are not hard to find. What is positive about some of these issues is that somebody else must have identified and corrected the WordPress issue that you face on your site.
However, it is worth remembering that you should always ensure that you have a full WordPress backup before attempting to fix any WordPress errors. Backups can be accomplished with several WordPress plug-ins including Updraftplus, BackWPup, BackupBuddy, and so forth. Alternatively, a manual approach may be used to back up your site. In this article, we’ll share more on some of these WordPress commonly known errors, and also how they can be resolved. Regardless of the themes you use, you’re expected to take this post as an insight to your problem solving approach every time you’re faced with problems on your website. Moreso, you can find links to these common solutions through the WordPress support site or forum where they detail on what should be done in case some of these strategies fail.
A breakdown to common wordpress errors
- Error establishing a database connection
- Parse Error/Syntax Error
- Internal Server Error
- Allowed Memory Size Exhausted
- Scheduled Maintenance Error
- Maximum Execution Time Exceeded
- 404 Page Error
- Image Upload issue
- Can not access WordPress admin area
- Connection Timed Out
Error establishing a database connection
As the error itself says, it is an error that occurs once WordPress cannot access the database. This issue results in users not being able to access WordPress at all. It may also be triggered by the failure of the database or by the risk of it being compromised.
WordPress websites use a database to manage all content and other site data. With inaccurate information in the config file, a WordPress website cannot access that data stored. Every access to your website will be linked to the database. To link to the database WordPress requires the following information:
- Database name
- Database username
- Database password
- Database server
This information is stored in your WordPress configuration file called wp-config.php. To edit your wp-config file access your cPanel and go to your file manager. From this you can get your WordPress root folder which contains the wp-config file. Highlight the file or simply right click on the file and click on edit and you will find a code such as this:
// ** MySQL settings - You can get this info from your web host ** //
/** The name of the database for WordPress */
define( 'DB_NAME', 'database_name_here' );
/** MySQL database username */
define( 'DB_USER', 'username_here' );
/** MySQL database password */
define( 'DB_PASSWORD', 'password_here' );
/** MySQL hostname */
define( 'DB_HOST', 'localhost' );
Check the credentials above if they match your database information you set before installing WordPress. In case everything in the file is totally correct, you will need to look for typos immediately and if they are all valid, then it is right to suggest for database repair.
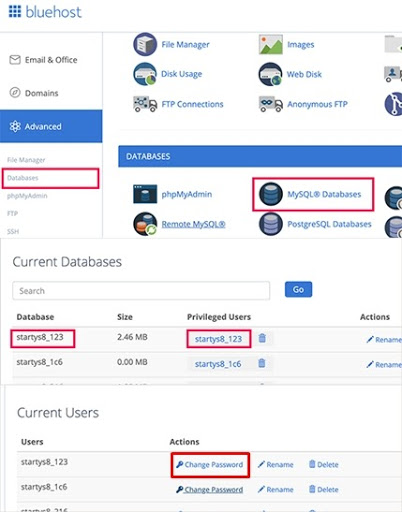
When it comes to repairing your database it will also involve the same wp-config.php file. At this point it means that the database is missing some files or else one or even several tables of the database have unexpectedly been inaccessible and hence need to be fixed or repair the entire database This can be achieved within your wp-config.php file by inserting the following line of code. Simply ensure the code is added just before the line “That’s all, stop editing! Happy blogging” in your wp-config file.
define('WP_ALLOW_REPAIR', true);.After having saved the file and restoring it back to your file manager in cpanel, you may browse the new file by heading to https:/yourwebsiteurl.com/wp-admin/maint/repair.php on your browser. The resultant web page should look like this:
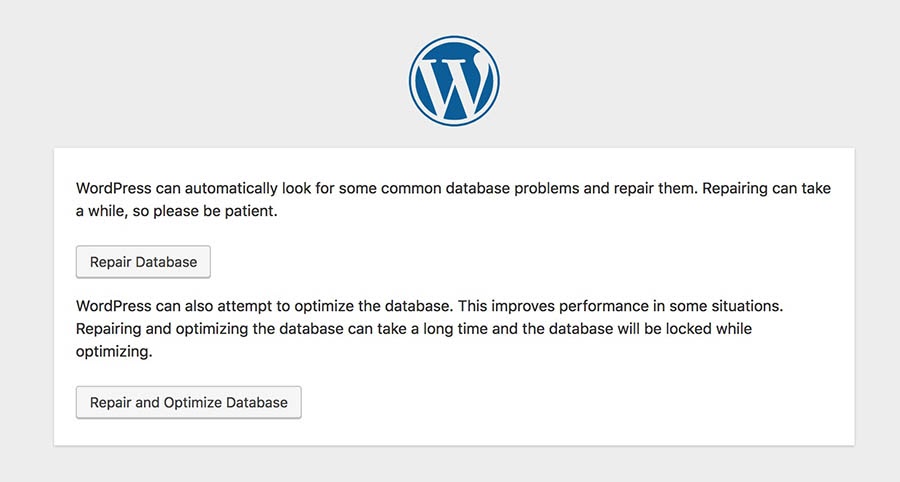
From the photo above, simply click on any of the repair buttons. When the operation is done, the page should be reloaded, and you will get a message informing you that the database tables have been modified or fixed. This approach is much quicker and easier, because the user never has to sign in to enter the database repair section. If you’ve done fixing and modifying your database, make sure you delete the code from the wp-config.php script. If this issue persists it is sure that the only problem would have come from the hosting side.
In case it concerns some problems with your hosting provider the next step should be simply to contact your web host. A common hosting issue which may be causing the problem is if the database has met its quota or if the server is down or you may have been hacked! Hosting agencies should be able to solve such issues within several minutes or hours.
Parse Error/Syntax Error
Although most of the errors we’re dealing with can be confusing because of how little details they provide you, the ‘parse/syntax error’ is quite helpful enough to tell you precisely what is incorrect. This error tends to happen once you attempt to add code segments to WordPress and then unintentionally omit something. Often, the syntax error is triggered by any incomplete or unwanted code character(s) in the error script. In most cases, someone who is less knowledgeable in the field of coding who is attempting to edit some lines of code in a theme or plugin, but it may also happen after you have installed a new theme or plugin that produces an error.

This error has no way around adding another code but simply locating the error in the code that you changed. Most users will often change the code of a theme or plugin from the theme editor section under Appearance >> Theme editor. However, such editors do not highlight or show you once you make a mistake while coding.
The ultimate solution would be to do an edition of your file using an FTP program for instance Filezilla. Upon installation of the software, you should link your WordPress site with it and access the theme/plugin file that you edited. In any case you do not know or don’t recall the file with the error, simply check the error code which shows the directory the file is stored. Highlight the file or right click on it and select edit and scroll to the specified line, for this case it’s line 456.
In order to fix the issue you will have to use the correct syntax. If you are not sure of what to correct, simply copy the whole line and search it on google to see if there are recommended fixes otherwise we would advise you to contact your technical support team to fix the issue for you
Internal Server Error
This error could sometimes be regarded as the 500 internal server error in some cases as its attributes from handling various WordPress requests.This issue is common if there is an unknown issue on the server side and this does not do the user any good since it does not show where the error came from. With this in hand, some of the known reasons why this error occurs include the following:
- Corrupted plugin functions
- Corrupted theme functions
- Corrupted .htaccess
- Exhausted PHP memory limits
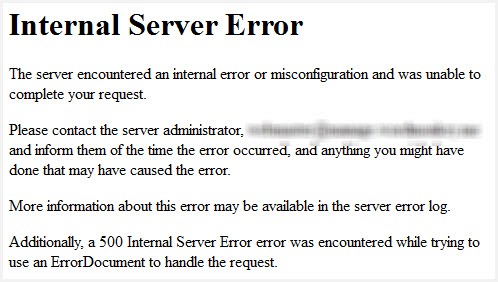
In most cases once the above error occurs users can not be able to access their WordPress admin dashboard. To solve this you can either use your cPanel or simply install an FTP program and link your WordPress site to perform these fixes.
The first recommended fix is to deactivate your plugins. It could be likely that the above error was caused by a specific unknown plugin and due to this, its best deactivating all the plugins.To identify which plugin is causing the issue, unfortunately if you have a bunch of plugins for your site, you will have to reactivate them one by one. Once the fatal plugin is identified simply delete the plugin and also we suggest making the author of the fatal plugin aware of the same issue so as to make updates or changes.
Secondly when it comes to the themes, you just need to change your current theme to the default twenty twenty theme and refresh your page to see if there are any changes. If no changes are present and the error persists it means there is a problem with some of your WordPress files. Time to move on to the .htaccess file.
The .htaccess file is commonly used to improve your site’s security and also it can override the default server configurations. To fix the internal server error by means of .htaccess file, firstly, you are required to rename the file to something like .htaccessOLD. By renaming it this way, you have completely disabled it hence it can not override any server settings.This should fix your issue but do not forget its key importance of maintaining your site security, thus, you need to create an error free .htaccess file. To create a new .htaccess file head to dashboard >> settings >> permalinks and in here you don’t have to change anything just click on save settings. It automatically generates a new default .htaccess file.
If this does not solve your issue it’s finally time to go to the php memory limit option. In this case you’ll need to find a way to increase the memory limit to which your wordpress files can handle. This issue has been tackled in the next common error for wordpress below.
Allowed Memory Size Exhausted
WordPress servers normally run out of memory similar to what we see in computers. This is attributed to various errors on the server side such as internal server error as mentioned above, and even fatal errors such as memory exhaustion as shown below.
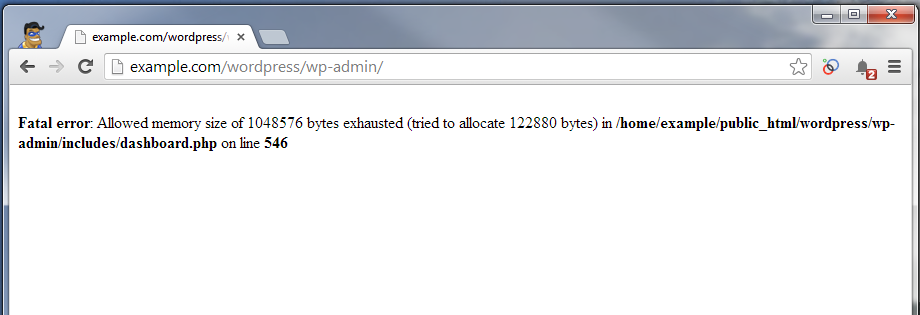
This is commonly caused by either a plugin or another file, say an image or video which is eating up your memory size or has entered in a never-ending processing loop. The default WordPress PHP memory limit on most hosting companies is usually set to 64MB which is normally not enough especially for heavy WordPress users.
To fix this error you simply need to increase the memory limit. The recommended size is 256M. To achieve this you need to access your wp-config.php file through the cPanel or through your FTP software and right click on it to edit.
After that, you’ll need to add the line code below just before the line “That’s all, stop editing! Happy blogging.” in your file.
define( 'WP_MEMORY_LIMIT', '256M' );Once you are done click on save and upload your file to the file manager if you’re using FTP else if using cPanel it will simply update after saving. The code above simply increases your WordPress memory limit to 256M which is sufficient for all your WordPress php files.
However, some host providers may restrict this option to increase your memory limit to ensure there is no overload. This can be solved by just contacting them with the aim to resolve this issue.
Scheduled Maintenance Error
In case you have come across the error ‘Briefly unavailable for scheduled maintenance’ when accessing your WordPress website, it’s not the end of the world. This error usually appears while updating WordPress core, plugins, or themes. Technically, it would be unfair to consider it as an error. It’s rather just a notification showing you that something did not complete when WordPress is performing its updates.
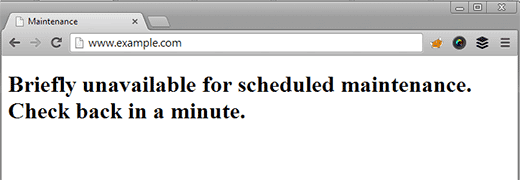
It’s important to note that from the image it says “check back in a minute”. This tells you that the problem can not be permanent. In the process of wordpress entering into maintenance mood it generates a .maintenance file and stores it in the root folder of your domain site.
To fix this issue is first of all to avoid it. This can be done by performing your theme and plugin updates manually perhaps through cpanel or through FTP method.
On the other hand, if you perform your updates normally within the WordPress core and the error gets into your path, simply access your site’s root folder and delete the .maintenance file. If you can’t find it here, ensure you enable show hidden files in your FTP software.
Maximum Execution Time Exceeded
In some instances you may come across an error that says “Maximum execution time of 30 seconds exceeded” or “Maximum execution time of 60 seconds exceeded.”This implies that it takes too long for an operation to be finished, so it’s timed out.
There are a variety of ways to remedy this mistake.This common error normally happens when the WordPress PHP file consumes a lot of time to execute an operation and exceeds the default grace period imposed by your WordPress hosting service. To host servers the time limitation is important to avoid users from misusing the server resources.

The manual remedy of fixing this issue is by editing your current .htaccess file which is located in the root folder of your device. Simply right click on it and select on edit and add the following piece of code:
php_value max_execution_time 300This edition shows that you’ve increased the execution time of the PHP script to 300 seconds which is 5 minutes. If that is not enough, increase from 300 to 600. Always remember to save the modifications you make to add the update.
Another manual fix would involve a code addition to the WordPress wp-config file which is also located in the root folder of the site. As done before right click on the file and hit edit then add the following to code to your wp-config.php:
set_time_limit(300);The final fix of such a problem would involve editing the php.ini file.The php.ini file is a settings file that specifies PHP parameters on your server. You might not find it within the WordPress folder on certain WordPress hosting platforms. This should result in you creating one at the root folder of your site’s file manager. On doing this, edit the file and add the following piece of code:
max_execution_time = 600The code simply performs the same action as the above two fixes and don’t forget to save your edition.
404 Not Found Page Error
The WordPress not found 404 error simply means that your server may not be able to locate the postings or pages on your website. This issue may happen suddenly, and in certain situations, after you have made abrupt improvements or updates within your WordPress website. However, there are occasions that the website is undergoing maintenance and the users will immediately be taken to a 404 error page. This normally occurs whenever your .htaccess file is removed or something changes from the rewrite permissions or rules. Under most circumstances, if a visitor clicks on a referenced link to a missed landing page, the web hosting service will immediately return the error code to the individual, such as “404 Not Found”. It leaves the user a bit confused in such circumstances
To fix this kind of issue you need to change your permalinks settings which can be accessed from Dashboard >> Settings >> Permalinks. So just follow these steps below:
- Log in to your WordPress Dashboard
- Go to Settings → Permalinks
- Select the Default settings or if is already selected proceed to next step
- Click Save Changes button
- Switch back to the settings of the previous configuration i.e the ones you selected before choosing default. Put the custom structure back if you had one or the plain.
- Click Save Settings
It will refresh the defaults of the permalinks and wipe the rewrite rules. Under most instances, this approach solves 404 warning messages for WordPress. Nevertheless, if this doesn’t work for you, you can need to modify your .htaccess file directly.
First step, sign in to your server via FTP, open the .htaccess file that is stored in the root folder which is the same place where files like / wp-content , wp-admin , wp-includes / are stored. You can then visit the codex htaccess page to obtain the default code for a .htaccess file. Simply copy and paste it into your .htaccess file and save the changes.
# BEGIN WordPress
<IfModule mod_rewrite.c>
RewriteEngine On
RewriteBase /
RewriteRule ^index\.php$ - [L]
RewriteCond %{REQUEST_FILENAME} !-f
RewriteCond %{REQUEST_FILENAME} !-d
RewriteRule . /index.php [L]
</IfModule>
# END WordPress
Image Upload issue
WordPress image upload issues can happen suddenly, and in other circumstances, whenever you make adjustments within your site. Nevertheless, some research is necessary in order to figure out the reason unto which WordPress just can’t upload photos and fix the problem.
Image upload problem in WordPress is usually due to inappropriate file permissions. When the folder being uploaded to does not have the appropriate file privileges, WordPress would not be allowed to store your files in it. It commonly affects the images in the wp-content folder and one may not even view files from the upload directory at times.
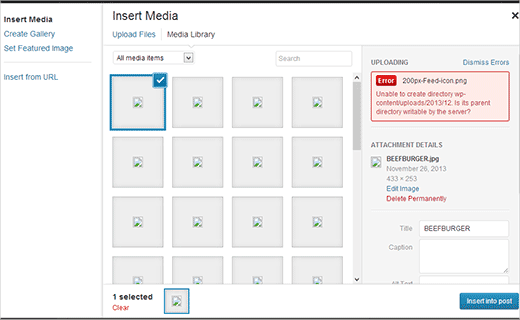
A glitch on your shared hosting service could alter those privileges while doing something such as performing an upgrade within the wordpress core. This error code does not give you any hint as to what could have triggered it. This implies that you will have to seek out possible approaches to find out the cause and correct that particular error.
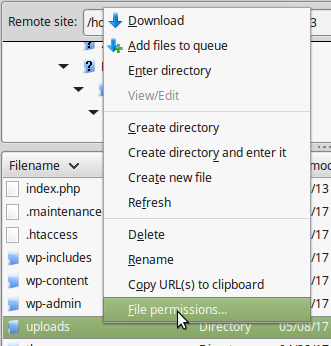
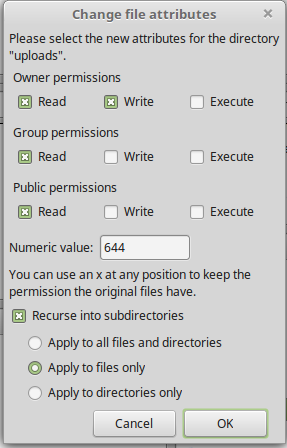
How to approach this fix is by first linking to your site through FTP, and simply head to the / wp-content / directory in your root folder. Within it, you’ll notice the upload folder under which WordPress keeps all the media uploads, including photos. Just Right-click that upload folder and then choose File Permissions to configure them. It will then trigger a window as shown below where you can change all configurations of your folder and also sub folders. Ensure you set them to 744 permission or if it does not work try 755.
To do this, insert 744 in the numeric value field, and afterwards check the “Recurse into subdirectories” box option and tap on the ‘ Apply to directories only’ checkbox button. To make these updates, select the OK button. Your FTP client should now begin to add file permissions to the appropriate files.
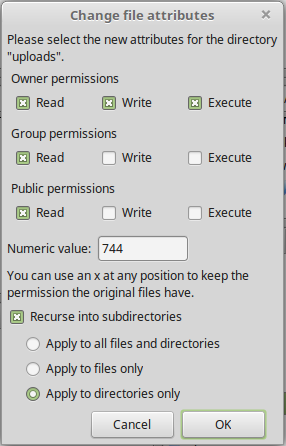
Similarly, do the same to the all the files in the uploads directory but in this case set permissions to 644 in the numeric value field and then check the “Recurse into subdirectories” box option.Then tap on the ‘ Apply to files only’ checkbox button. Finish by clicking ok which saves all your changes.
Can not access WordPress admin area
In some cases you could encounter errors of being locked out of the WordPress Server and you are unable to sign back in to the WordPress dashboard. It occurs in most cases because you’ve lost your password and can not gain access to the dashboard and change it nor can you have access to the recovery email for your password. This may also arise if the account privileges have been changed. It is mostly directly linked to a hack. Hackers will compromise your website, and will then erase your admin rights.
This approach is very simple once you have access to PhpMyAdmin on your hosting service. Before undertaking the following actions, we suggest that you perform a backup for your site. First step, you will have to sign in to phpMyAdmin and click on Databases to show all databases in your account and then identify your specific WordPress database.
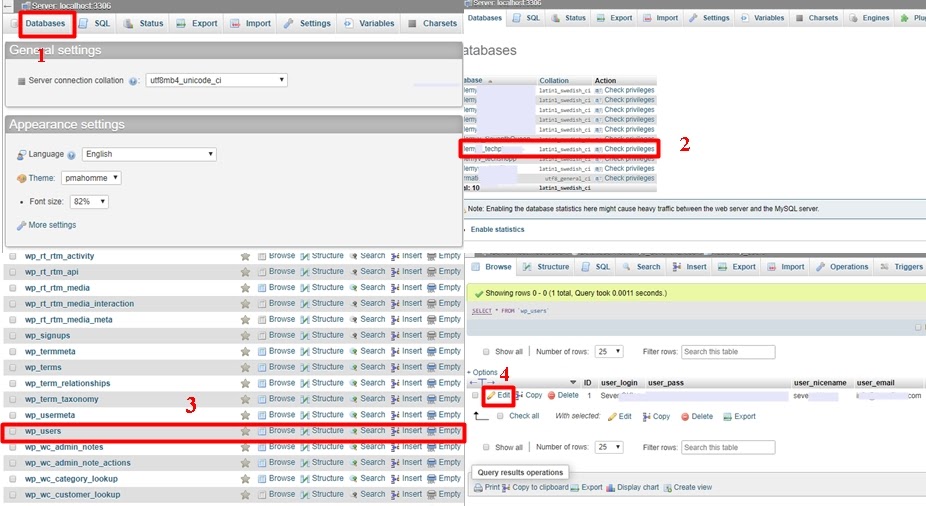
When you’re in, here you should make changes to the wp_users and wp_usermeta tables. When clicking on the wp_users list, select the edit button next to the admin user. Under the “users_pass” input box, select md5 from the function dropdown list and enter the new password you would wish to set and click on go. Having done this, you can head on to your WordPress admin area to login with the newly created password and your initial username.
Connection Timed Out
This might arise for a number of reasons. The most common is a case the website does not have the assets it requires to operate appropriately. For starters, when you are using shared hosting, some other site may be storing the assets and tools of your website. Alternatively, the website could have reached the full mandated bandwidth if the hosting service was not overburdened.
The common causes for why this error happens could arise from usage of heavy plugins, theme function issues, and exhausted PHP memory limit. If you’ve managed to raise the memory cap of your WordPress in the php file as discussed earlier, that can fix the issue. However, only if you’re hosting your website with a strong hosting service provider.
An alternative approach would be to disable all plugins and reactivate them one-by-one and figure out which plugin triggers the bug, and then selectively uninstall the one that causes the error. More so switching to the default twenty twelve theme would help figure out if it is a theme issue or not. Finally for this issue we would recommend optimizing your site’s speed to avoid straining the shared server.
Wrap Up
We’ve addressed several of the most frequent WordPress errors in this post. Nonetheless, the greatest strength of WordPress arises through dozens of plugins and themes which you can use on your website. Any plugin or theme installed on your site can cause errors or affect site speed(Learn how to use CDN and speed up your site). Encountering WordPress problems is obliviously uncommon, and it can be really stressful when it happens.


No Comments