


It has been a couple of years since WordPress was introduced to the IOT industry and since then there has been an upward trend on this content management system (CMS). Starting from its security, its integration with other platforms, its search engine compatibility and its general simplicity.
Most web users and developers opt to use it because it is easy to install with no major complications. In fact research suggests that 33% of site owners use WordPress as their content management system. More so, when it comes to being SEO friendly it earns its points too.
WordPress is capable of creating websites of any kind due to its ability to support multipurpose themes and plugins/addons built by developers. With this regard, I do not expect a developer wanting to know how to install WordPress as he/she is familiar with programming languages such as HTML, CSS, PHP which basically makes up WordPress. Even so, there may be starters to the web industry who do not know on how to go about installing WordPress within their newly purchased domain. Well, this article is for you, and by following these steps you’ll have no second chance to to leave for another CMS platform.
Step 1: Choose a Reliable Hosting Service
Hosting providers are the beginning to your installation of a WordPress website. This is because there is no single point you will want to be experiencing server issues from your hosting service, hence the need to choose a good provider. Recommended hosting providers would be Bluehost, Siteground, Dreamhost among others. More so other hosting providers come with WordPress pre-installed within them such as Bluehost. Hosting services contain the cPanel (Control Panel) which has the Softaculous app meant to install your WordPress site for free. Upon choosing and registering your domain with a good hosting service it should provide you with access credentials to your cPanel including its URL. From there dig in into installing your WordPress site.
Step 2: Softaculous App Installer
Softaculous is a popular auto-installer script library which allows the integration of various web applications which are open source such as content management systems in just simple steps. Hosting providers such as Namecheap, Siteground use such apps to ensure users are not stranded when configuring certain web application platforms such as WordPress. Here are the steps to follow when it comes to WordPress installation and in this case lets use namecheap as an example.
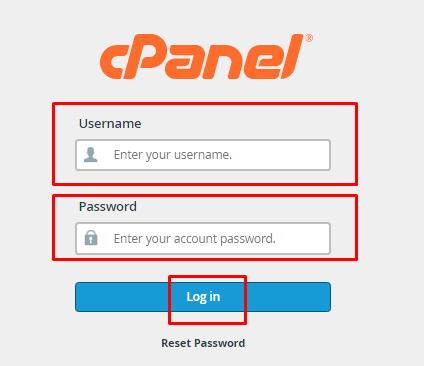
1. cPanel Login
Ensure you first access your cPanel from your hosting provider and insert the correct credentials.

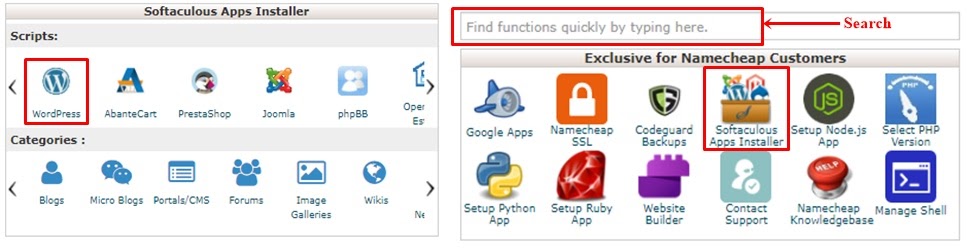
2. Access Softaculous App For WordPress
Upon clicking the Softaculous app installer it takes you to its dashboard where you can see various CMS systems and WordPress is normally the first one. Alternatively one can scroll down on your cPanel to access the WordPress platform under softaculous scripts as shown below. In case you can’t find the installer simply search it within your cPanel as there is a dedicated option for searching various functions or apps.

3. Select and Install WordPress
Upon selecting the WordPress logo section the installation begins which takes you to a page with various options such as Install, Overview, Features, screenshots until Import. Ensure you select the Install tab to proceed:


4. Installation Steps
Once you click on the install now button shown above it takes you to a page with several action steps you need to define.
- First you need to choose the WordPress version upon which you want your WordPress to run on. We recommend using the latest version as it is prone to bugs and common WordPress errors among them being security. In the same section you need to choose or insert your registered domain. In this case it’s important to use HTTPS protocol as it shows your site is secure and usually an SEO friendly technique.


- The next section involves the user selecting the site title and its description. In case you need a WordPress site that will contain multiple users you can enable that within the WPMU check box. Next you’ll need to type in your chosen admin username , password and email. The most crucial part is the password which you’re required to use a strong password for your WordPress site to avoid security threats such as hacking and brute force attacks. To set a strong password simply click on the key icon which will suggest you a password, all you need to do is save it somewhere for future logins. Finally one can opt to select a language of his choice.


- The next option involves installing the recommended plugins and themes within WordPress. This option may not be important if you have precise themes you already need to use. However a single caching plugin is recommended to improve your WordPress site speed. Advanced options can be ignored as they are set automatically which involve database setup. Once completed simply hit the Install button, and that’s IT!


Once done a pop up should appear letting you know that the installation has completed. In case you do not access your WordPress site live, you simply need to point your nameservers to the domain you registered and wait a few minutes for them to link.
Step 3: FTP / cPanel File Manager WordPress Installation
This is basically a 5 minute wordpress installation manual technique though a bit technical. This requires the use of FTP (file transfer protocol) which is used to transfer local files within a client and server. Well, enough of the technicalities let’s dive into WordPress installation steps.
- WordPress Download
By this point we assume you already have your cPanel configured and open. The first thing one needs to do is to download the latest WordPress file. The WordPress download file comes as a zip file. Thus once in your download folder, simply extract the zipped folder to access all WordPress files which you need to upload to the cPanel host server. Note if you use cPanel directly you do not have to unzip the folder since you can unzip it from the file manager.
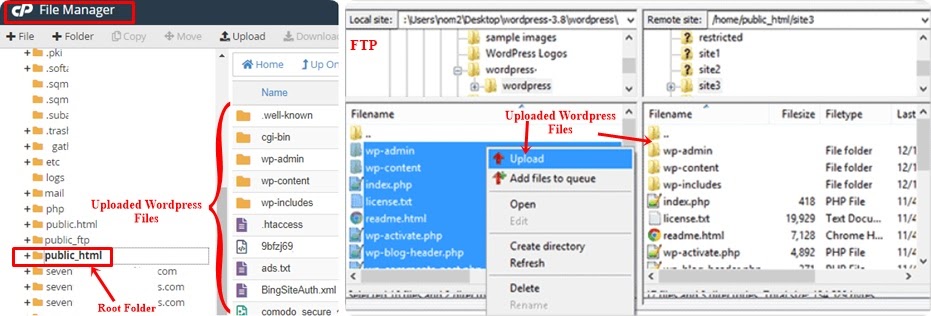
- Upload WordPress Zip
In this step, you need to connect to your FTP client hosting server. For cPanel, simply login and click on the file manager option. Once in the folders section upload the Wp files to your website server. For both FTP/cPanel users head to your domain main root folder usually ( /public_html/) and upload WordPress files from there.

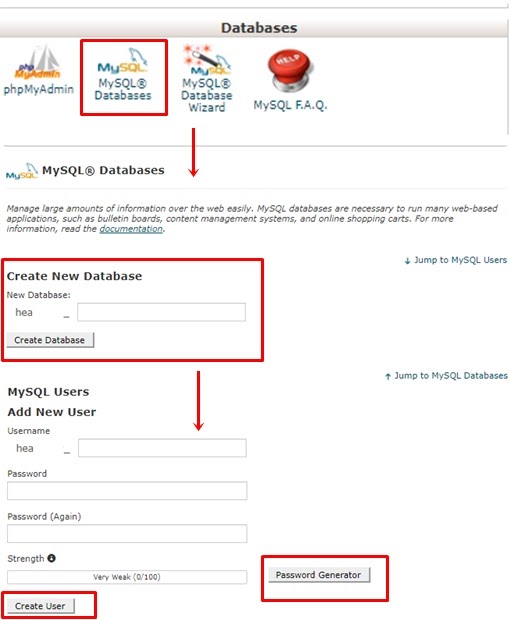
- Database Creation
Once completed, you will need to head to the cPanel main page and create a database. Normally WordPress sites store data under the mySQL databases. On the main page scroll to the databases section and select the MySQL option. The next page should prompt you to create a new database whereby you should insert the database name. Upon creation, the database will require a user which you can create by scrolling down to the users section and select create new user and type in a username and a strong password for security purposes.

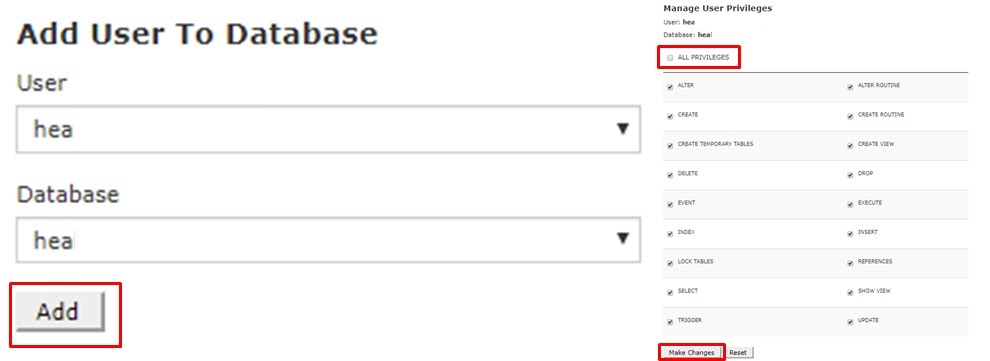
- User Permission Access
Next you need to allow permissions for the user to access your new database. In that case simply add or link the user to the database and allow all privileges for the user. Once done go back to the database page and take note of your database name, username and password.

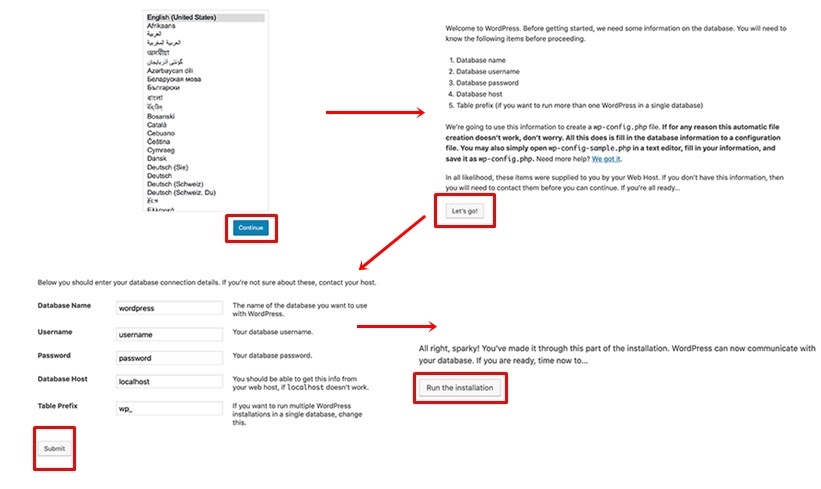
- Installation Progress
To begin the installation process simply go to your wordpress registered domain such as mydomain.com or mydomain.com/wp-admin which will take you to the configuration start page. Here first select your preferred language. Hit continue and land on a page that gives instructions on database credentials which are required then click on “let’s go”. This page you need to fill in the saved database credentials on step 3 which include its name, username and password. Table prefix and database host should be left as default. Next, simply click on the ‘Submit’ button and WordPress should link to your database automatically and show you a success message. On this page click Run installation to complete the task.

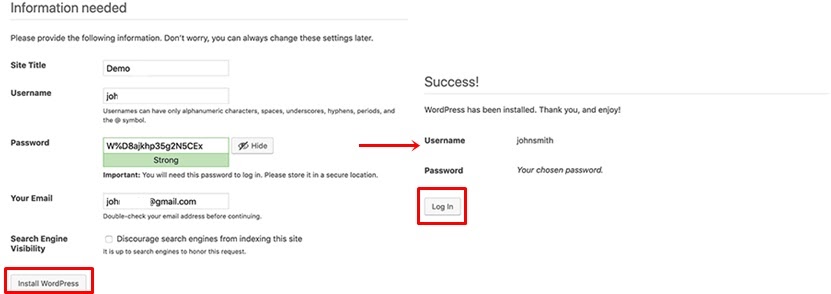
- Site Info
In the next section you should provide your website information such as your Website title, description, username, password, and the email address you’ll use as an admin. This email is necessary in case you forget your password
Next, in case you don’t want your website to be visible to search engines like Google, then you can check the box next to search engine visibility. This is important for SEO purposes thus we recommend leaving it unchecked.

Wrap UP
WordPress installation could prove a difficult task for beginners mostly but with the tutorial above users can be able to easily go through a smooth installation process without experiencing any problems. We encourage users to use these methods and also try out installing themes and plugins in a similar FTP way.
No Comments